1. Install WHMCS to your website, you can read and follow the instruction here.
If you want us to install this for you, please add Addon "Custom WHMCS Services" and we can install it for you and configure your reseller system for you so that you are ready to sell instantly.
2. Set Up Server (Login as Admin and Click on Setup -> Server)
- Enter your WHMCS Admin
- Hover to "Setup" and click "Server"
- Click "Add New"

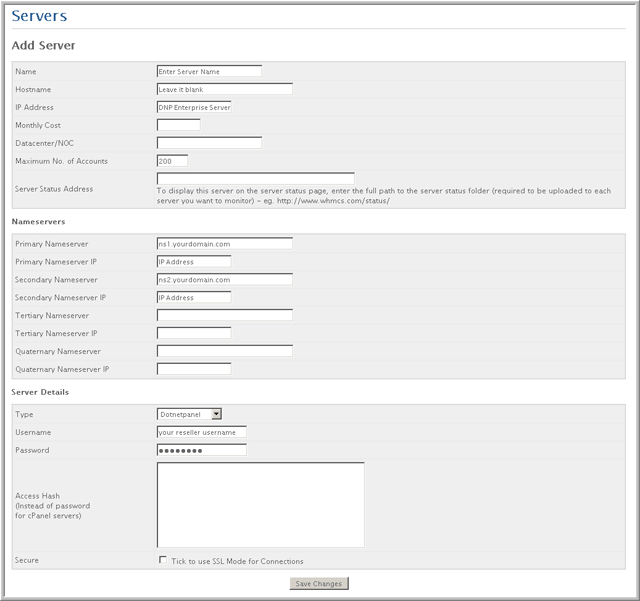
- Fill in Name for your server name (Up to you to name the Server)
- Leave blank "Host Name"
- Fill in Name IP address with 174.133.158.178 (DNP Enterprise Server)
- Fill in Name Server with your name server
ns1.yourdomain.com and ns2.yourdomain.com
use IP from Ping ns1.gppnetwork.com, ns2.gppnetwork.com
example:
ns1.yourdomain.com with IP 70.87.211.26
ns2.yourdomain.com with IP 208.43.207.89
- Select "Type" with DotNetPanel
- Enter your reseller username and password
- Click "Submit"
3. Create Product Group
a. Enter your WHMCS Admin
b. Hover on "Setup" and click "Product & Services"
c. Click "Create a New Group"
d. Fill your "Product Group Name"
e. Tick on "Available Payment Gateways"
f. Click "Create Group"
4. Create Product
a. Click "Create a New Product"
b. Choose "Product Type" and "Product Category"
c. Fill in the "Product Name" and click "Continue"
d. Click "Pricing" Tab
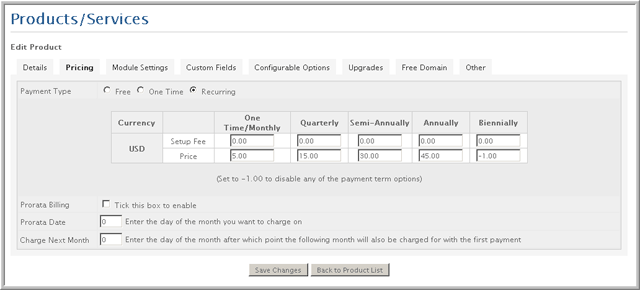
Select Payment Type (free / one time / recurring)
Insert your pricing amount.
Set -1 if you want to disable the payment option
Set 0 if you want to give it free
e. Click "Module Setting" Tab
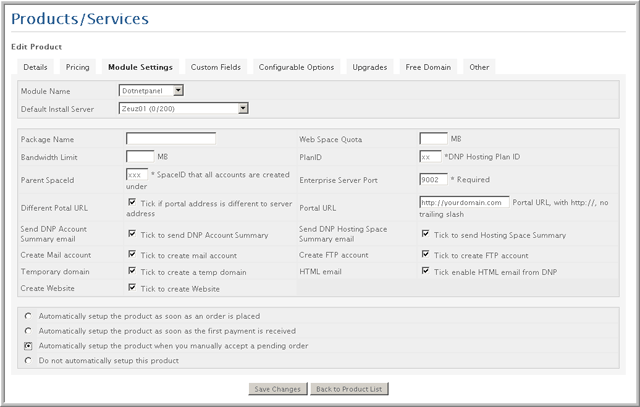
- Select "Module Name" with DotNetPanel
- Select "Default Install Server", choose the server that you have setup at step 2.
- Fill in "Parent SpaceId" (Step Below)
- Login to DotNetPanel
- Click on your Reseller hosting space (Hosting Plan)
- And you can see at URL location http:///Default.aspx?pid=SpaceHome&SpaceID=151
- Your SpaceId is 151 (Example only)
- Tick on "Different Potal URL", "Send DNP Account Summary email", "Create Mail account", "Temporary domain", "Create Website", "Send DNP Hosting Space Summary email", "Create FTP account", "HTML email"
- Fill in "PlanID" (Step Below)
- Login to DotNetPanel
- Click on "Hosting Plans" at your left panel
- Click on your hosting plan name
- And you can see at URL location http://panel.webhostforasp.net/Default.aspxpid=HostingPlans&mid=19&ctl=edit_plan&PlanID=69&UserID=106
- Your PlanID is 69
- Fill in your "Portal URL" to your domain DotNetPanel Portal that you already installed before.
- Select your setup activation plan and we recommend you to select "Automatically setup the product when you manually accept a pending order"
- And click "Save Changes"
5. For further WHMCS configuration, you can check at WHMCS documentation.
